 Dedicated Support Team

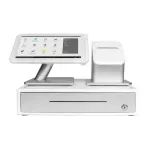
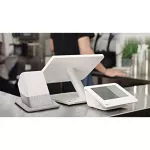
The Clover Station Duo terminal is a robust point-of-sale system designed for restaurants, retail stores, and other service businesses with customers seeking a speedy checkout. Tailored for fixed-location merchants, this device includes a dual-facing display, a customer-facing printer, a scanner, and a cash drawer. It can also support contactless payments, ensuring that customers quickly complete transactions. The Clover Station Duo 2 POS system ensures efficient operations with its advanced features, making it a top choice amongst other options.
A user-friendly and advanced hardware system with a built-in printer, cash drawer, and comprehensive software capabilities.
A 14 in. HD display for you and an 8 in. touchscreen for your guests to confirm their order, pay, leave a tip, and request a digital receipt.
Offering a large memory capacity, this device comes with ample storage (2-GB RAM and 16-GB Flash) to help speed up data transfer times and protect sensitive information.
Print receipts instantly and without hassle with this high-speed thermal dot printer that requires no ink.
Accept cash with this cash drawer featuring a bill tray, coin tray, security cable, and two keys.
Scan barcodes faster with 5 MP cameras on both displays for 1D and 2D barcode scanning.
The Clover Station Duo is a promising solution for retail businesses that want to take their business to the next level. This device offers a top-of-the-line experience—thanks to its stunning color display, robust processing capabilities, and ample memory storage. Streamline your payment operations with the Clover Station Duo, featuring a chip reader, terminal WiFi, fingerprint login, a scanner, a screen protector, a second screen, weight scale compatibility, and contactless payment options, including Apple Pay. Make your transactions more efficient so you can focus on growing your business!
Clover hardened version of Android (AOSP) 8.1 (API Level 27, Oreo)
11" x 7.5";22.8 lbs.
Wifi, LTE
EMV chip card reader, NFC reader, and MSR reader
Hard Plugin
Qualcomm® Snapdragon™ 660 octa-core processor
Hub with four USB device ports and two RJ12 cash drawer ports
2-GB RAM, 16-GB Flash
5 MP camera for 1D and 2D barcode scanning
High-speed thermal dot printer
Merchant facing: 14.0” IPS HD Display/Customer facing: 7.0” IPS HD Display
3 1/8" x 230
N/A
N/A
Apple Pay, Google Pay, Samsung Pay, Android Pay, Visa payWave, MasterCard PayPass
Cash Discount and Surcharge
N/A
This device complies with Part 15 of the FCC Rules. This equipment has been tested and found to comply with the limits for a Class B digital device, pursuant to part 15 of the FCC Rules. This equipment complies with radio frequency (RF) exposure limits adopted by the Federal Communications Commission for an uncontrolled environment. This device complies with ISED’s license-exempt RSSs.
May 22, 2023
To perform a soft reboot:
1. Swipe down from the top right corner of the screen.
To perform a hard reboot:
Press the power button at the bottom edge of your display for more than 10 seconds.
Once your Clover device has restarted, log in.
If your device does not reboot, contact Clover Support.
Push the green button on the back of the Clover Station Duo Display until you see the Clover logo appear on the screen.
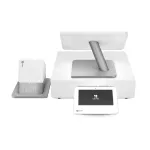
The main difference between the two is that the Clover Duo has both a front-facing display and a customer-facing display, while the Clover Station has a single rotating display.
The Clover Duo is an all-in-one point-of-sale system that allows you to provide quick service at your business, whether a restaurant, retail store, or a service business.
The Clover Station Duo has a 14” HD display for your use and an 8” touch screen for customers. Along with making payments, they can redeem rewards and request a digital receipt. It also comes with a cash drawer and all the necessary software for you to run your business already installed. The Clover Station Duo is also customizable and compatible with various countertops, handheld devices, printers, and scanners. It’s ready to be used as soon as you take it out of the box, with minimal training necessary, and it accepts every type of payment, including Apple Pay®, Google Pay™, and PayPal/Venmo® QR codes. The Clover Station Duo is secure with end-to-end encryption and integrated chip sensors. It can also track and report all transactions and monitor your employees’ performance.
To conduct transactions on the Clover Station, first, open the Register or Manual Transaction app. Then, enter the sale amount or select items in the Register app. Select the ‘Charge in Sale’ or ‘Pay in Register’ app. Then, swipe a magnetic stripe card or take cash or other payment. Request a signature from the customer and enter a tip if the option is enabled. Choose your receipt option from Print, Email, or Text, and finally select ‘Done.’
Original price was: $379.00.$0.00Current price is: $0.00.
Original price was: $380.00.$0.00Current price is: $0.00.
$426.99